Sunday 17 July 2011

Mad Week!!

So this week has just been plain crazy.  It started last Sunday, I got a call from Sammy's husband asking if I could make a card for him to give her for her Birthday on Wednesday.  My design brief was something classic, not frilly and purple....


So I sat down Monday night after work with the best of intentions, and came up with absolutely nothing.  My creativity was out the window and absolutely nothing would work for me.  I decided to give up and try again Tuesday night.


Tuesday night was it, I had to come up with something for Damian, and in the end I was pretty happy with the results.  Using a mixture of the KaiserCraft Lilac Avenue and Utopia Collections I finally had things coming together.  I had been wanting to use my Utopia clear stamps for awhile and this seemed the perfect opportunity.  The flower and leaves in the top left corner of the picture below is stamped onto watercolour paper with Jet Black Staz-On and coloured with distress inks.  It matched the paper collection colours perfectly as you can see by the flower in the bottom right hand corner that has been cut from the Utopia Idyllic Paper.


So let's have a look -


So my card for Sammy was actually the one i ended up making at her place two weeks ago.  I was feeling bad that morning as I was heading over to give it to her because she had already seen it, and at one point was helping me put it together as I got stuck.  However, this is the first card I made using my Magnolia Secret Tilda stamp, and I really wanted Sammy to have it.


It was funny, when I gave Sammy her card she said "oh, I was hoping you were going to give me this card"  Beauty, I had nothing to worry about!! :o)


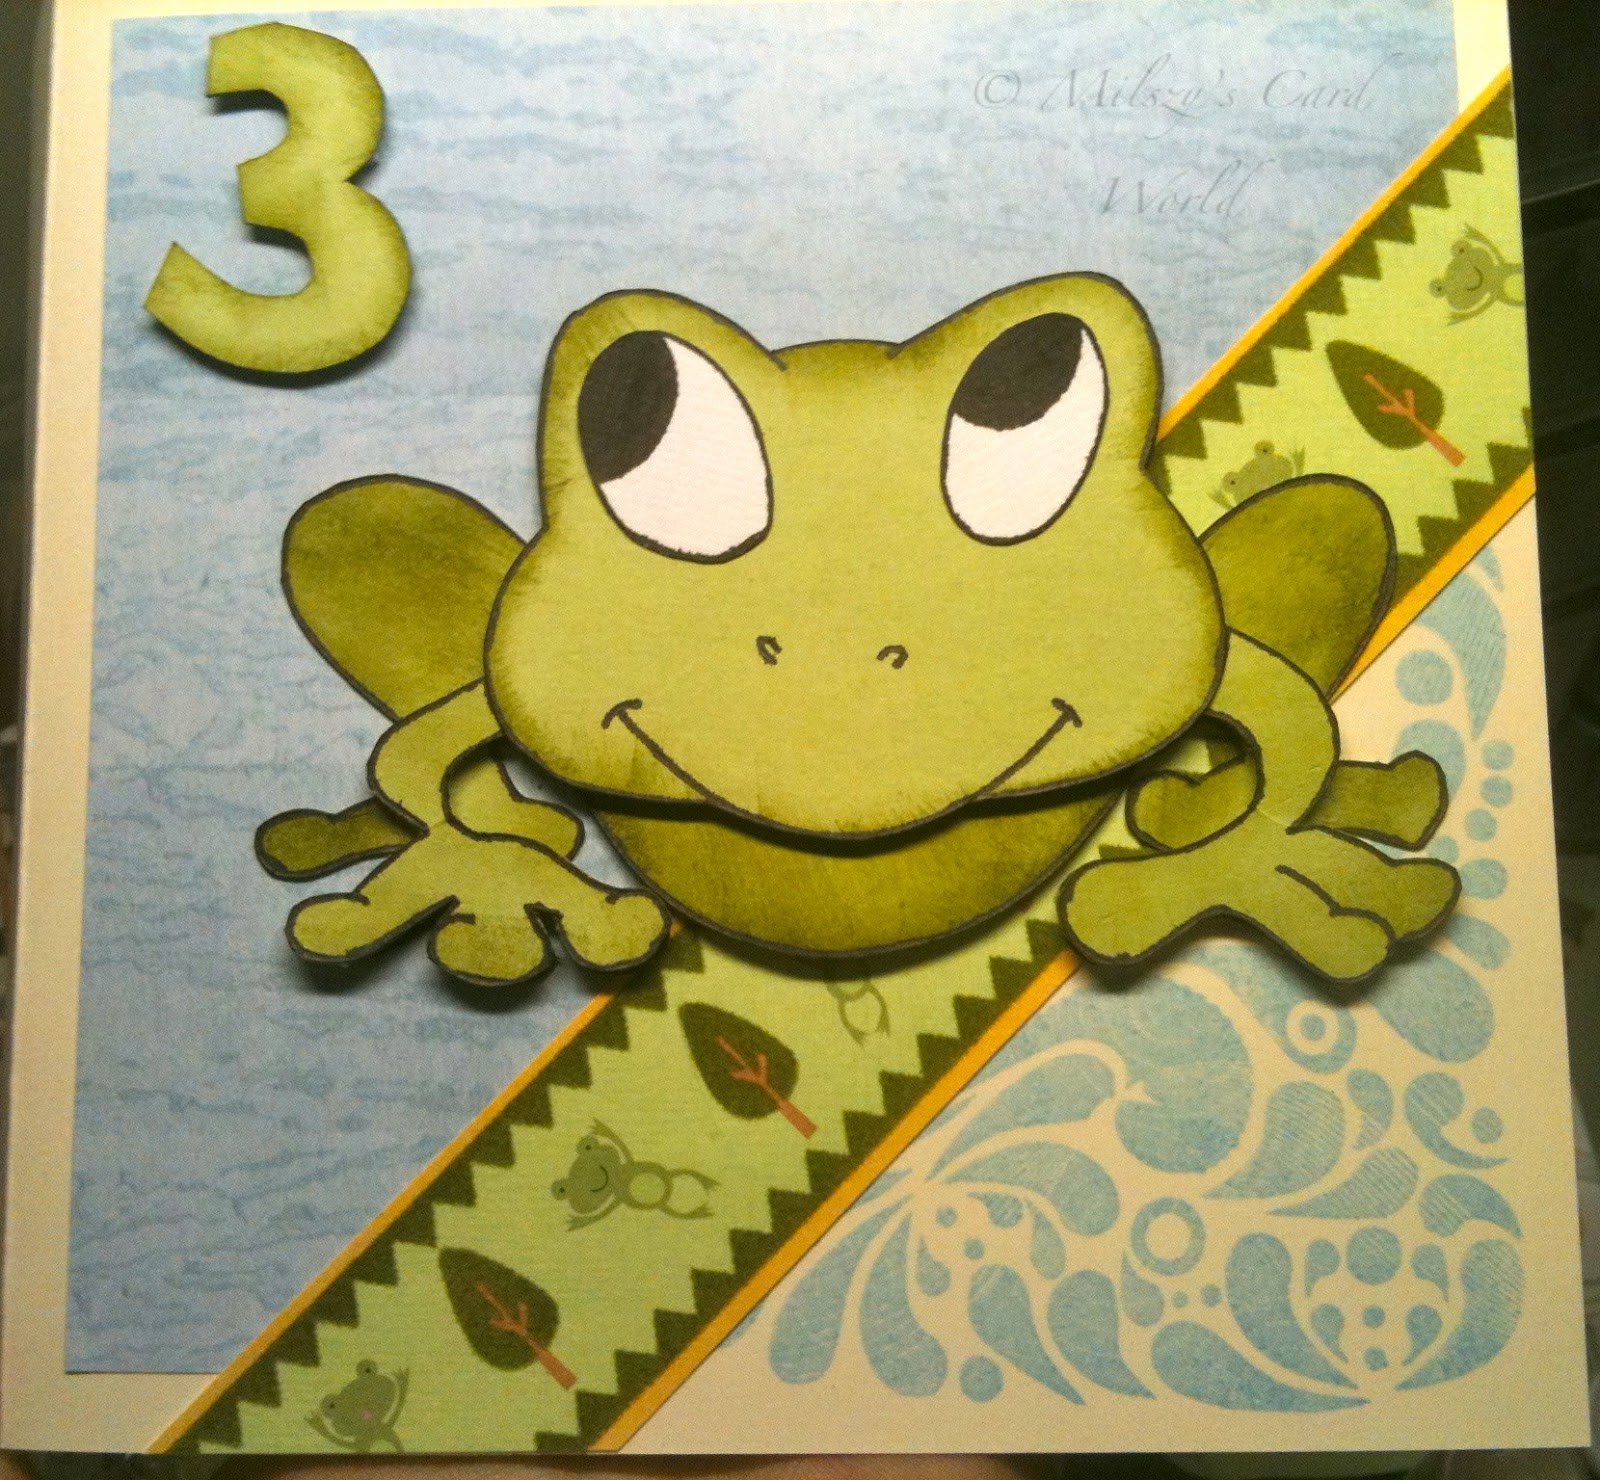
Saturday the 16th July was my youngest Nephews 3rd Birthday, so for Will's birthday card I decided to try and make a frog.  To get my image that I traced around I did a Google image search to find a picture.  I cut out the entire image and traced around it to use as the base...


I then cut it out using my craft knife..


Then using my original picture I Googled, I chose the areas I wanted to raise up, and cut out these pieces to attach with foam mount later...


Then I have traced around the edge of the pictures using a Black Gel Pen, and used Distress Ink Forrest Moss with a sponge to add some shading...


I also added some shading to the legs, and then started to put all together using foam mounting squares..


My little froggy is starting to come together.  Finally I added some eyes and we have a finished frog ready to attach to a card...


A little cute I think, but hey I made him ;o)  Finally the finished product....


Then finally I had to make a card for my Brother.  I decided to use a stamp from the KaiserCraft Seaside Collection stamps and colour it with Distress Inks.  It took quite awhile to ink in the selected areas but I really was happy with the finished product.


OK, so I think that finishes up this week.  I haven't listed all my products used, but please if there is something you are interested in feel free to leave a comment and I will most certainly respond.


Thanks for looking and have a great night!!


xx Milszy

Saturday 2 July 2011

Shopping and spending the night at Sammy's

So today my friend Sammy and I went and hit some scrapbook stores, we went to three in all -


Camelot Studio


Seriously Scrapbooking
Kaisercraft


I can guarantee the bank balance is now a lot less than it should be!


So tonight I am at Sam's house, and am here to spend the night, and I have packed up my stuff and brought it with me to scrap.  Hopefully I might have some photos later to show you.


But for now I can catch up with a card I made recently.  This is a farewell card I made for my boss who recently moved from Adelaide to Nova Scotia -


I have used the Compass and Mesh stamp from Kaszazz, the Nautical Trio stamp from Stamp-It which I coloured in with the Aquacolour crayons and ink blended around with antique linen.  The paper is from Webster's Pages, Ladies and Gents Groomed Traveller collection.  The wording was a cheap little aphabet stamp set that I picked up at my local Cheap as Chips.


So back to the beginning, when I first started to make cards, this is one that I made for Miss Sammy's birthday, so long ago I can't even remember what year... nor would I be able to tell you the products that I have used.


As you can see my style has changed a bit over time as I have learnt more techniques.


Well time to put the computer away and start sorting through my stash to work out what I might make tonight!!


Thanks for visiting :o)

Friday 1 July 2011

Welcome

So this would be my first ever Blog.  I have been home from work sick for the past two days, and am starting to get a little stir crazy.

I have an obsession, which I will be sharing here, and that is Scrapbooking.  Currently I am very interested in making cards, and learning the new technique of hand colouring stamps with Distress Inks.

I had my first go yesterday afternoon with this, and with help from another Blog post I found I don't think it looks to bad for a first go.  Unfortunately the light wasn't superb for taking a photo, my unit doesn't let much light in, but still shows up pretty well.  I learnt the effects from this talented young lady - Critchley Creations

Here is my first attempt with the Magnolia range Sneaky Tilda Stamp-


I followed Rachel's colours (link to her blog above) with a couple of changes, but now I am looking forward to seeing where I can go from here.

I have also been experimenting with my Ma's aquacolour crayons. Firstly I stamped my Kaszazz Gecko stamp with Staz-On ink, it's a bit smelly but permanent so not effected with the water brushes.  The first day I painted him I was pleased with the effect as it was my first attempt ever using these.  I think the hardest part was controlling the amount of water coming through the brushes.  However I will let you judge for yourself (keep in mind I am not good with having consistent shadowing yet across my figures, something I need to work on)


So I went to use this little guy for my friends birthday card, and when I looked at him again he seemed very washed out.  So instead of starting straight with the card, out came the crayons again to try and make him pop off the page -


As you can see he is a lot brighter!!  I then used the Kaszazz Mesh Stamp with Forest Moss Distress Ink to try and give the effect of the reptile skin around the edge.  Before attaching to the card I also sponged over the mesh stamp to increase the effect.

And the finished product :o)

  
Thanks for stopping by, feel free to leave a comment and see you again soon :o)
Related Posts Plugin for WordPress, Blogger...