Showing posts with label Distress Ink. Show all posts

Sunday, 27 July 2014

Time flies when you are having fun...

Hi there and Hello :)

An hour or so ago and I was on the couch struggling to stay awake, check my email and find some amazing news and so not sleepy anymore..but more on that later ;)

As I have so many projects to catch up on I am going to post a lot of photos and try and keep the words to a minimum tonight so I can get my blog back up to date with where I am at with all my projects.  

I hope you enjoy, you may want to make a coffee before you start ;) and if you have any questions on Copic/Distress colours used, or other materials please feel free to leave me a comment and I'll do my best to help you out :)  Links to images used are all the way through to help you out :)

Starting with the two Mother's Day projects I made this year, my Ma's present made with Aurora Wings Image White Poppy and coloured with Distress Inks


For my sister's Mothers Day Card I used a Hannah Lynn Image - Cali Girl


Miss K's birthday is another Hannah Lynn image available through Crafts and Me - Amber Eyes


Happy Birthday Shinks with Kraftin Kimmie's Birthday Friends and background paper made by using Annabelle Stamps - Scribble Scrabble 1


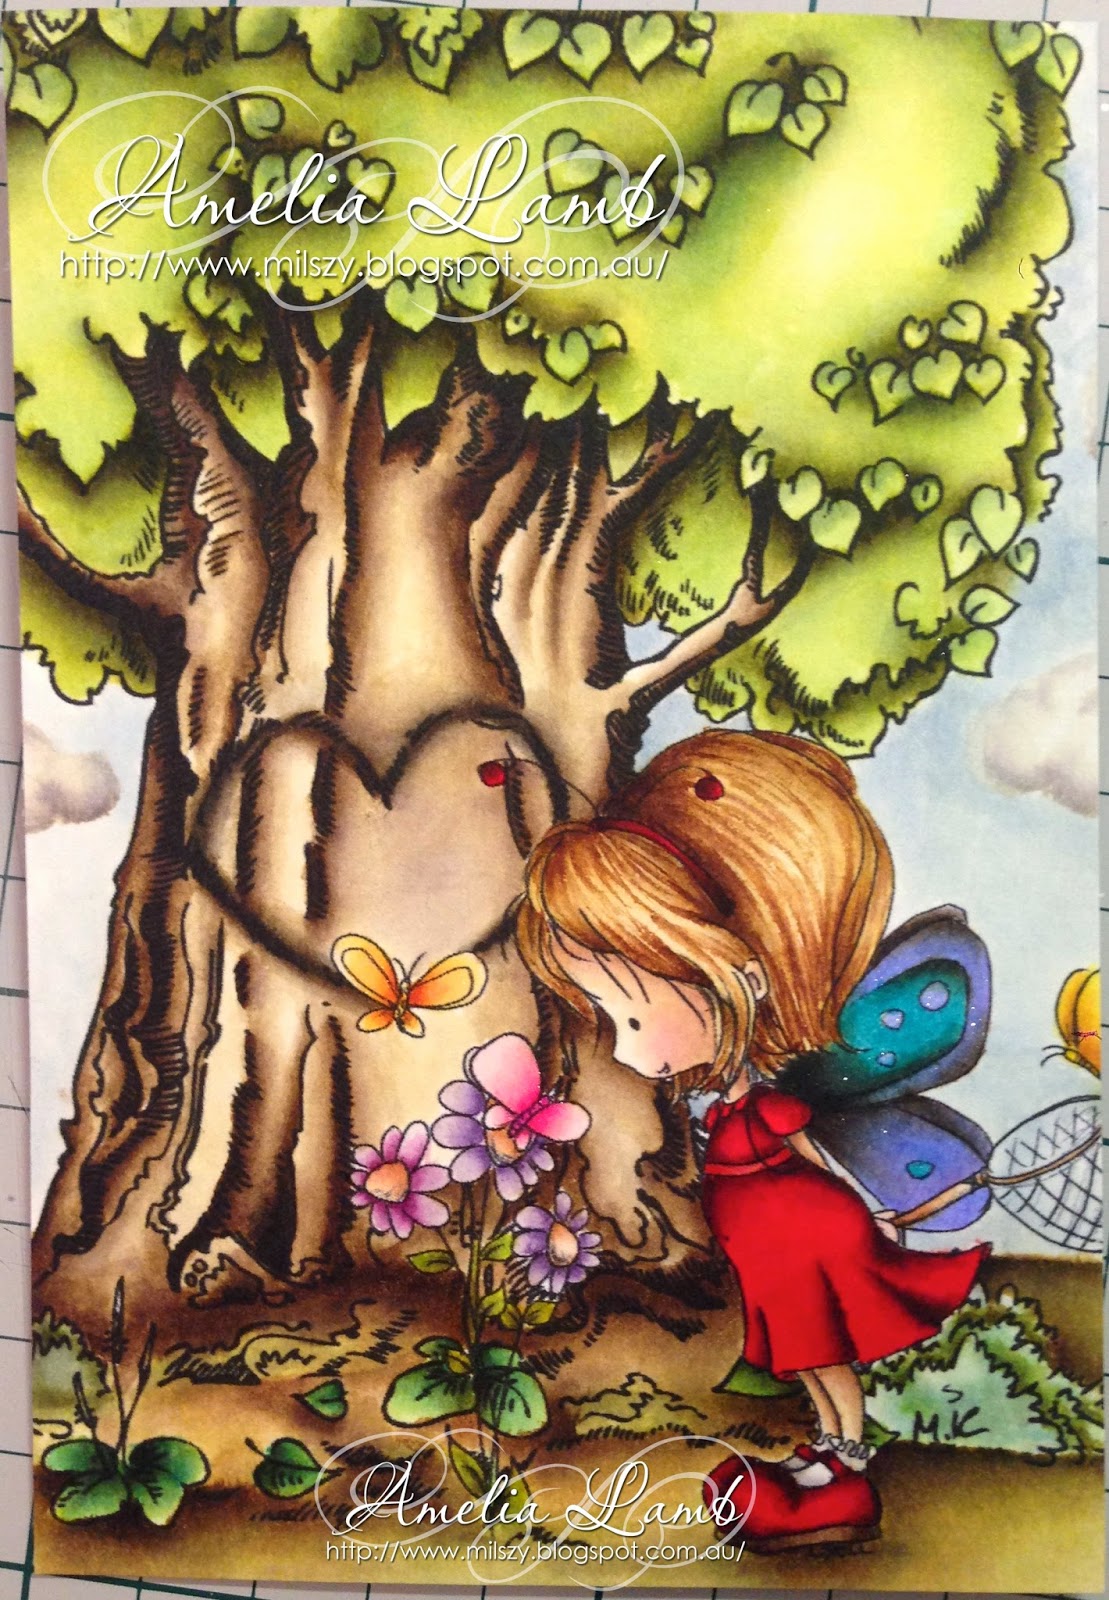
For beautiful new baby Isla I used Saturated Canary's Butterfly Baby masked with Make it Crafty's Daffodil Dell


This one was a commission piece using two Magnolia Stamps masked, On the Road Tilda and Tulip Walkway


For handsome baby boy Kaan - the image is from Little Miss Muffet Stamps - Babe Moon Lullaby


Gorjuss little Ladybird Gorjuss Girl :) 


A card for a very special Miss J using Saturated Canary's Butterfly Princess, zoomed and cropped


Participating in a colouring competition over in the Kit and Clowder Facebook group I bought this beautiful image from The Stamping Chef - Alyce.  I had so much fun with this image and really pushed myself out of my comfort zone with the colours I used and I was super happy with the results!!


This next piece is also courtesy of a Kit and Clowder Facebook group colouring competition.  This gorgeous image is from The East Winds - Floral Kiss  I was lucky enough to be a random winner of two free digis from this competition, one of which you will see below.  This card was for Miss N, which also marks my 1 year anniversary for using Copic Markers.  I used markers on an image for Miss N's birthday for the first time last year :)


My nephew turned 6 on the 16th July and when I asked Mr W what sort of picture he would like on his card he said he wanted a dinosaur.  So I picked this image as I thought it looked like him dressed up in a dinosaur costume.  This image is from Tiddly Inks - King of the Wild Ones


A very soft and lovely birthday card for Miss L using one of the digi's I won in the Kit and Clowder colouring competition. From The East Wind - 'Aurora' Daisy.  I was so, SO happy with how the hair turned out on this image, it shows that my classes with Alyce at Kit and Clowder are definitely paying off!


Next up a card for my best mate's husband, using another image from The Stamping Chef, Miss Smexy.  It was only as I was uploading and watermarking this evening that I realised I forgot to colour her eyes... I want to fix them!!!


For my favourite Miss S's birthday this year I used this cute as stamp from La-La Land - Ladybug Marci - I love Ladybirds!!

This second image shows the gorgeous sparkle from the Wink of Stella brush I used on her wings


This next piece was a step WAY out of my comfort zone.  I keep seeing all these gorgeous 'no lines' coloured images, but hadn't been confident enough until now to try it.  This little cutey from Tiddly Inks - Whatcha Doing?, seemed like the perfect image to try it out for the first time, not to complicated.  Super happy with how this turned out!!


This card for JLo was made using Tiddly Inks - For the Birds


For Miss J another Tiddly Inks Image - Ellie Says Hi


Last up tonight another image from a Kit and Clowder Facebook Group colouring Competition.  This image was offered a free image to the members of Kit and Clowder from All Dressed Up.  I tried to do something a little different by using my gold prisma pencil and add a touch of face paint/make up to her face to try and fit the theme.


We are there, I hope you are still awake ;)

Thanks so much for looking and please feel free to leave any questions below

xx


Saturday, 12 April 2014

Weddiversary

This last week has seen a celebration of two marriages, 1 a wedding :)  and the second a 5 year Anniversary.

Last friday I was lucky enough to be invited to attend the Wedding of my Ma's, Partner's Son held at Maggie Beer's in the Barossa Valley.  Such a lovely setting, and it was a gorgeous day.  The bride C looked amazing, and the groom D was dashing.  C & D went with a country theme for their wedding, and the setting was perfect.  

Considering the theme I chose to use my distress inks and colour in a gorgeous stamp from Lili of the Valley called Over the Threshold.


My best mate and her husband were married five years ago on the 11th of April, as Sammy is also a fellow paper crafter her husband had asked me if I could help out with a card for the occasion.

I had this gorgeous digital image (only available in rubber now) from Little Miss Muffet Stamps called The Stolen Kiss that I hadn't printed and used yet that I thought would be perfect.  Coloured with Copics (colours below) I used a simple card design to let the picture be the star of the show.  The sentiment I made using a free font I downloaded from the web, I just love flowing cursive script like this, I wish I could write like that!!


Happy 5th Anniversary to you both xx


Copic Colours
Purple - V20, V22, V25 and V28
Brown - Lady E70, E71 and E74
Brown - Man E70, E71, E74, E77 and E79
Flowers - R35, R37 and R59
Leaves - YG25, G94 and G99

Thanks for looking

xx


Sunday, 30 March 2014

March Challenges

Good afternoon bloggers,

Today has been a gorgeous day here in Adelaide, lots of beautiful sunshine and I have spent the day inside under artificial light finishing off my little scene I showed you in yesterday's post.

A short and sweet post to show you my finished product as now that i have finished I must get to all the chores I have been ignoring all weekend... boring!!

I would like to enter this piece into the following two challenges - 

Make it Colourful challenge # 7 Spring is in the Air
Kit and Clowder March Challenge Wings


Thanks for looking :)

xx


Saturday, 29 March 2014

Distress Inks with Digital Images

Hi, Hello :)

Well it has certainly been awhile between posts, there has been some crafting going on in the background, but projects have been few and far between unfortunately.

However the last few weeks my back injury seems to have settled down, and while there have been some terrible days with it I am starting to feel like I can get back into my colouring again.

Now because I haven't been crafting there has been plenty of time to look through the internet and research, and I finally came across a printer that allows me to print my images and colour with my distress inks.The Epson Dura Brite ink is water proof, and it works sensationally!!

I printed up the cutest little scene to test it out and I have been having such fun.  My images are from Tiddly Inks - Fluttering By to Say Hi and Make It Crafty - Tree of Love.

Firstly I started with the tree trunk and coloured a layer of watered down antique linen as my base colour.


Next layer is Frayed Burlap, this is a rather subtle colour but I like the depth it adds to the final blend.  It helps me to begin planning where I am going to place my shadows.  This is something I am still working on, I think my 'light source' jumps around a bit, but I am having fun, so not super worried, and I figure it will sort itself out over time the more I practice :)


Next, straight to my darkest brown Walnut Stain.  Darkening my shadows, I do this very slowly to ensure I don't get to heavy handed.  Small sections, with many layers of colour until I am happy with the result.  For the love heart on the tree I used a small amount of Black Soot to really define and try and give the illusion it has been burnt into the tree.  A bit of Antique Linen to finish and smooth out all the colours and add some of the colour 'washed away' through the other layers.


Next up the tree top. I missed a photo here whoops - but you get the idea from the first Antique Linen layer I did on the trunk.  For the tree top though a very watered down Shabby Shutters.  The tree top now has some sparkle to as I didn't realise the brush I was using had left over glimmer mist in it....whoops.  Next layer shown below is to start mapping shadows in the leaves with Peeled Paint.


Final shadows are then done with my Forest Moss.  Then i went back in with the Shabby Shutter, this time more concentrated and Peeled Paint to add more roundness and better colour.  The leaves also have a touch of Bundled Sage to try and shadow them without having them blend too much into the rest of the tree top.


So a little more time to paint this afternoon before my Ma's very early Mother's Day present this evening.  We are off to the Festival Theatre to see the Rocky Horror Picture Show and I am sooooo looking forward to it!!  Girls Night :)

Thanks for looking, and feel free to leave any questions if you have them.

xx


Sunday, 1 September 2013

Backyard General

Evening all,

I hope you have had a lovely weekend.  The weather here in Adelaide has just been awesome, beautiful warm sunny days which is a nice change :)

Last week my oldest nephew turned 9 making Aunty Milly feel very old ;)  I had bought the gorgeous little Backyard General Saturated Canary Stamp from Little Darlings many months ago now ready to James' card with.

I wanted to paint him with army camouflage, but just didn't have any paper to match so I decided to make my own using my distress stains.  I was really happy with how it turned out.

The 'net'  I made using some hessian and pulling out strands until I was happy with the effect.  I put some eyelets in and attached it to the card using some chocolate brown string I had in my stash.


For my camouflage paper I started with a white piece of card, and added a layer of Antique Linen distress stain over the whole piece.  Once the first layer was dried I added a random patter with Shabby Shutter, Frayed Burlap and Walnut Stain Distress Stains. I then went back in with a sponge and the same colour browns to 'dirty' it up a bit, for the green I used Forest Moss instead of the Shabby Shutters as it was a darker, browner green.  The stamp around the edge is from Kaisercraft called Distress.


A close up shot of this cute little guy :)


Thanks for stopping by :)

xx


Monday, 26 August 2013

It's a Lili Wedding

This is the first time I have been able to use this gorgeous stamp from Lili of the Valley that I purchase some months ago now.

This is another card I have made for a friend to use, and I was going to try and stick to the theme on the wedding invitation which was black and white.... it just wasn't working for me this weekend though.  So instead I went back and started over with browns and cream, and a hint of pinks/reds with my distress inks.

This gorgeous image from Lili is called Over the Threshold, here it is in the early colouring stages.


The gorgeous patter around the edge is from the Vintage Garden Stempleglede Stamps.


Getting there slowly :)


I would like to enter this in the 2 Sisters Challenge Blog - Challenge # 158 Square Cards

Thanks for looking

xx


21

Tonight have a card made for a friends Niece.  21 is such a special age, and deserves a special card.

For this one I went dramatic, lots of black and white with bold red.

The image is call Genevieve, designed by Hannah Lynn and sold through the Crafts and Me store.  I love this image, it is so dramatic, and her hair is just gorgeous.


I had the image painted, but by the time I did all the red hair her skin just looked to pale.  So I went back in with Tattered Rose and Vintage Photo to give her a little more colour.


I have taken to decorating the inside and backs of my cards over the last few months, so a couple of photos to show you the rest of the card.


I would like to enter this in the 2 Sisters Challenge Blog - Challenge # 158 Square Cards

Thanks for looking

xx


Sunday, 11 August 2013

Just a little note...

Good evening, 

Here we are with the last post of the night.  Today I made a card to say thank you.  The last few weeks at work have pretty crappy for one reason and another.  For me especially with my back, I am at 4 weeks and two days since my injury and I have about another 2 weeks until I am back to normal according to the physio :(  One of our team has provided such support that me and one of the other girls want to say thank you.  I of course offered to make a card.  

Using my new Vintage Garden stamps from Stempelglede I came up with this gorgeous card (even if I do say so myself, lol), painted with Distress Ink refills.


The beautiful butterfly die cut is from Cheery Lynn, with flowers from Prima and Wild Orchid Crafts, the little note stamp is from Stampendous.  Paper comes from Kaszazz one of my favourite papers of theirs.

A few more pictures to finish with.


The Stempelglede stamps are so beautiful, and just such lovely quality.

Linh, thank you for your help and support, it has most definitely been appreciated, you are an integral member of Production and I am so happy to have you as my colleague and on my team!!

Thanks for stopping in.

xx


Related Posts Plugin for WordPress, Blogger...